Showing posts with label tutorial. Show all posts

Tuesday, July 10, 2012

Summer Pinterest Challenge: DIY Silhouette Painting

Hey there, friends!  :-)

Today I'm linking up with Young House Love for their Summer Pinterest Party -- a way to get all of us crafters and bloggers to actually complete one of the hundreds of crafts or projects we spend so much time pinning!  :-)


This party idea was dreamt up by Katie from Bower Power, so before I start in with the project that I completed, make sure you check out these great projects from the host bloggers!

Katie  --  Kate  --  Michelle  --  John and Sherry   

All righty -- here we go!

Last week, when I heard about this party, I consulted my DIY board on Pinterest and made a very careful decision.  Okay.  Not really.  I just picked the first thing that I had pinned, because, honestly, there was no way that I was going to be able to make a choice.  


This is the picture that I originally saved, and I the reason I pinned it was not to follow the project's instructions, but to use it as a starting-off point.  Think of this as an *inspiration picture.*  :-)

I knew that I wanted this to be the beginning of our gallery wall, which is going on one of the {mostly bare} walls in our living room.  I thought this would be a cute idea to implement the two will-be standout colors for our living room (blue and green), and it also gives a sweet nod to my dear husband and I with the male and female silhouettes!  Perfect!

What You Need


Picture frame
Silhouette that you like printed from the internet
Watercolors
Paint brushes
Water
Pencil
Scissors

Now first thing's first -- put on those glasses!  You're going to need to see lots of detail!  ;-)

Cut the silhouettes out of the paper with ample paper still around them...

Like this!  This makes it easier to cut into the tiny details.  Slowly and carefully cut around the silhouettes.

For small details, like lips, noses, and inside-of-the-ponytail, I used small scissors from my self-manicure kit.  These worked great.


Arrange your silhouettes onto a sheet of nice, thick white paper (you are going to paint on it).  Then, trace.


Then, start painting!  It is best to try out your colors on a piece of scrap paper so you know you are getting the right shade if you are going to mix.  I wanted a darker blue and a medium green, so it took some tweaking.


Now, as you can see, on the male silhouette, I messed up!  I painted too much on his mouth (shaky hand); so here is where I improvised.  If you do this part correctly, you don't have to do what I did next.  

I cut out the silhouettes again.  

Then I sprayed them with a clear acrylic coating to give them a nice glossy look.

I mounted them onto a new sheet of nice paper with my scrapbooking adhesive strips -- very easy.

And then I framed it!


The extra mounting step is optional, but my husband did say it looks great to have it pop off the page a little bit.  ;-)

So there you have it!  My contribution to this month's Pinterest party, and the start of our gallery wall!  The fun has officially begun, people!

Total Cost: $12 (Frame- Target; Watercolors- Target) 

What do you think?

Have you created something you've pinned recently?  What was it?

love,
maria

Linking up!


52 Mantels

Positively Splendid

Saturday, March 17, 2012

How To Sew a Pillow Cover For Beginners: A Guest Blog Post

Good morning, friends!  :-)  Happy Saturday (and St. Patrick's Day) to you!

Today, Lisha from One House One Couple is our guest blogger, and she's got a great tutorial for you all -- the perfect, easy weekend project!  Take it away, Lisha...

Hey everyone, I'm Lisha from 1house1couple. Maria was kind enough to invite me over to do a guest post here at All Things Luxurious, and I am super excited to share one of my latest home projects with you. I just did this a couple days ago so it’s fresh in my mind.


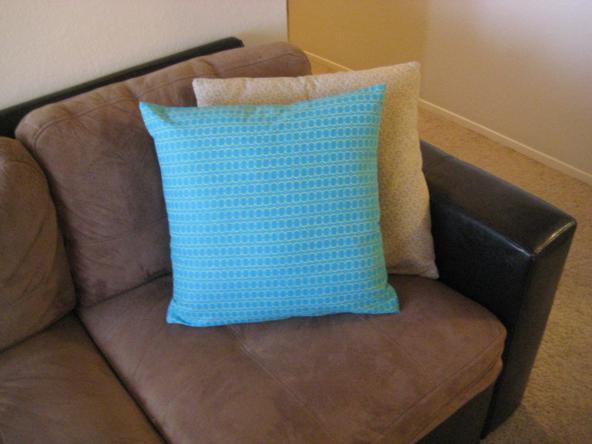
Now to forewarn you, I am not a decorator. I’m definitely more comfortable with a hammer in my hand than a sewing machine. I’m also really frugal, so I tend to purchase the bare minimum for furnishings and décor in my house. Most things that I decorate my home with I simply find somewhere, or it was given to me. But lately I’ve been getting an itch to do a little revamping and add a little more spice and color to our home. So I decided to cover our couch pillows with a fun fabric:


Old couch pillow:


Fun Fabric:


Here’s a shot up close so you can see the design:


First I measured the length of the pillow, from one seam to the other side.

Then I measured where I wanted my sewing to go on the fabric:


And I sewed it inside out, because that’s how you sew things, of course:


I’ve only used a sewing machine like 3 times in my life. I know. Can you believe it? But it’s true. And my friend was here to help me thread it and get it all ready for me, so I was able to start it and I was pretty successful for the first few lines of sewing. But I did get a bunch of up thread at one point:


But I just turned the corner and just kept going anyway, and it worked out okay:


I don’t have any pictures of the big fiasco I had in my pillow cover sewing adventure. This was after I
took the bobbin out to check to see if I was getting low on thread in the bobbin, which I wasn’t, so I put
it back in. When I continued sewing the upper thread kept breaking. I tried to call my friend, but she was busy at work, and I called my husband (the seamster in our marriage) and we tried to troubleshoot it for a while, with no luck. So I went online to see if there were any video tutorials for setting up a sewing machine. And it turns out, I didn’t know that the bobbin had to click and set. I was just placing it in the bobbin area without pushing it in and making sure it clicked. Boy, do I feel lame.

So once that was properly set I finished with flying colors. I sewed three sides (plus a tiny bit by the
corners on the 4th side) and then I put it around the pillow to make sure it was going to fit:


It fit perfectly, so I went back to the sewing machine to sew the 4th side and I realized that I’m too
lazy, so I simply covered the pillow and tucked in the extra fabric! Walla! No one will ever know the
difference!


Plus, if I ever wanted to wash the cover it would be easy to take it off the pillow, wash it, and put it back on.

Here’s a close up of the finished product:


I’m pretty proud of myself because my pillows turned out quite well. I covered two pillows with that
fabric. My husband came home and inspected my work and he said I did a good job. Yay me!

So, now that I know how the bobbin works I won’t be so afraid to sew next time. What do you think of
the pillows? The pretty fabric really makes the room feel more fun and less drab than it did before.

I want to thank Maria for allowing me to steal her blog for the day. You all can come and visit us any time at 1house1couple!

***
Love this tutorial, thanks so much for sharing with us today, Lisha!  Now head on over to her blog and check it out!  :-)  Have a safe day and evening, lovies!   I will catch you back here tomorrow.  ;-)

love, maria